
There are lots of ways to improve your site’s performance. Serving your static assets from a CDN, using GZip or Brotli compression, and concatenating your CSS/JS files should be on the top of your list. One thing that may not be on your radar is lazy loading your images.
What is lazy loading?
Lazy loading images involves programmatically inserting images into the DOM only when the image becomes visible within the viewport. It is “lazy” because we choose not to download the image data until it is viewed. This can be extremely beneficial for pages like blogs or landing screens, where only a fraction of your audience will view the entire content.
How beneficial is lazy loading? We created a before and after page to illustrate how important it can be to lazy load images. Our example is a sample blog post. Blogs are a great example because they often have lots of images, and most of them are below the fold (outside of the viewport).
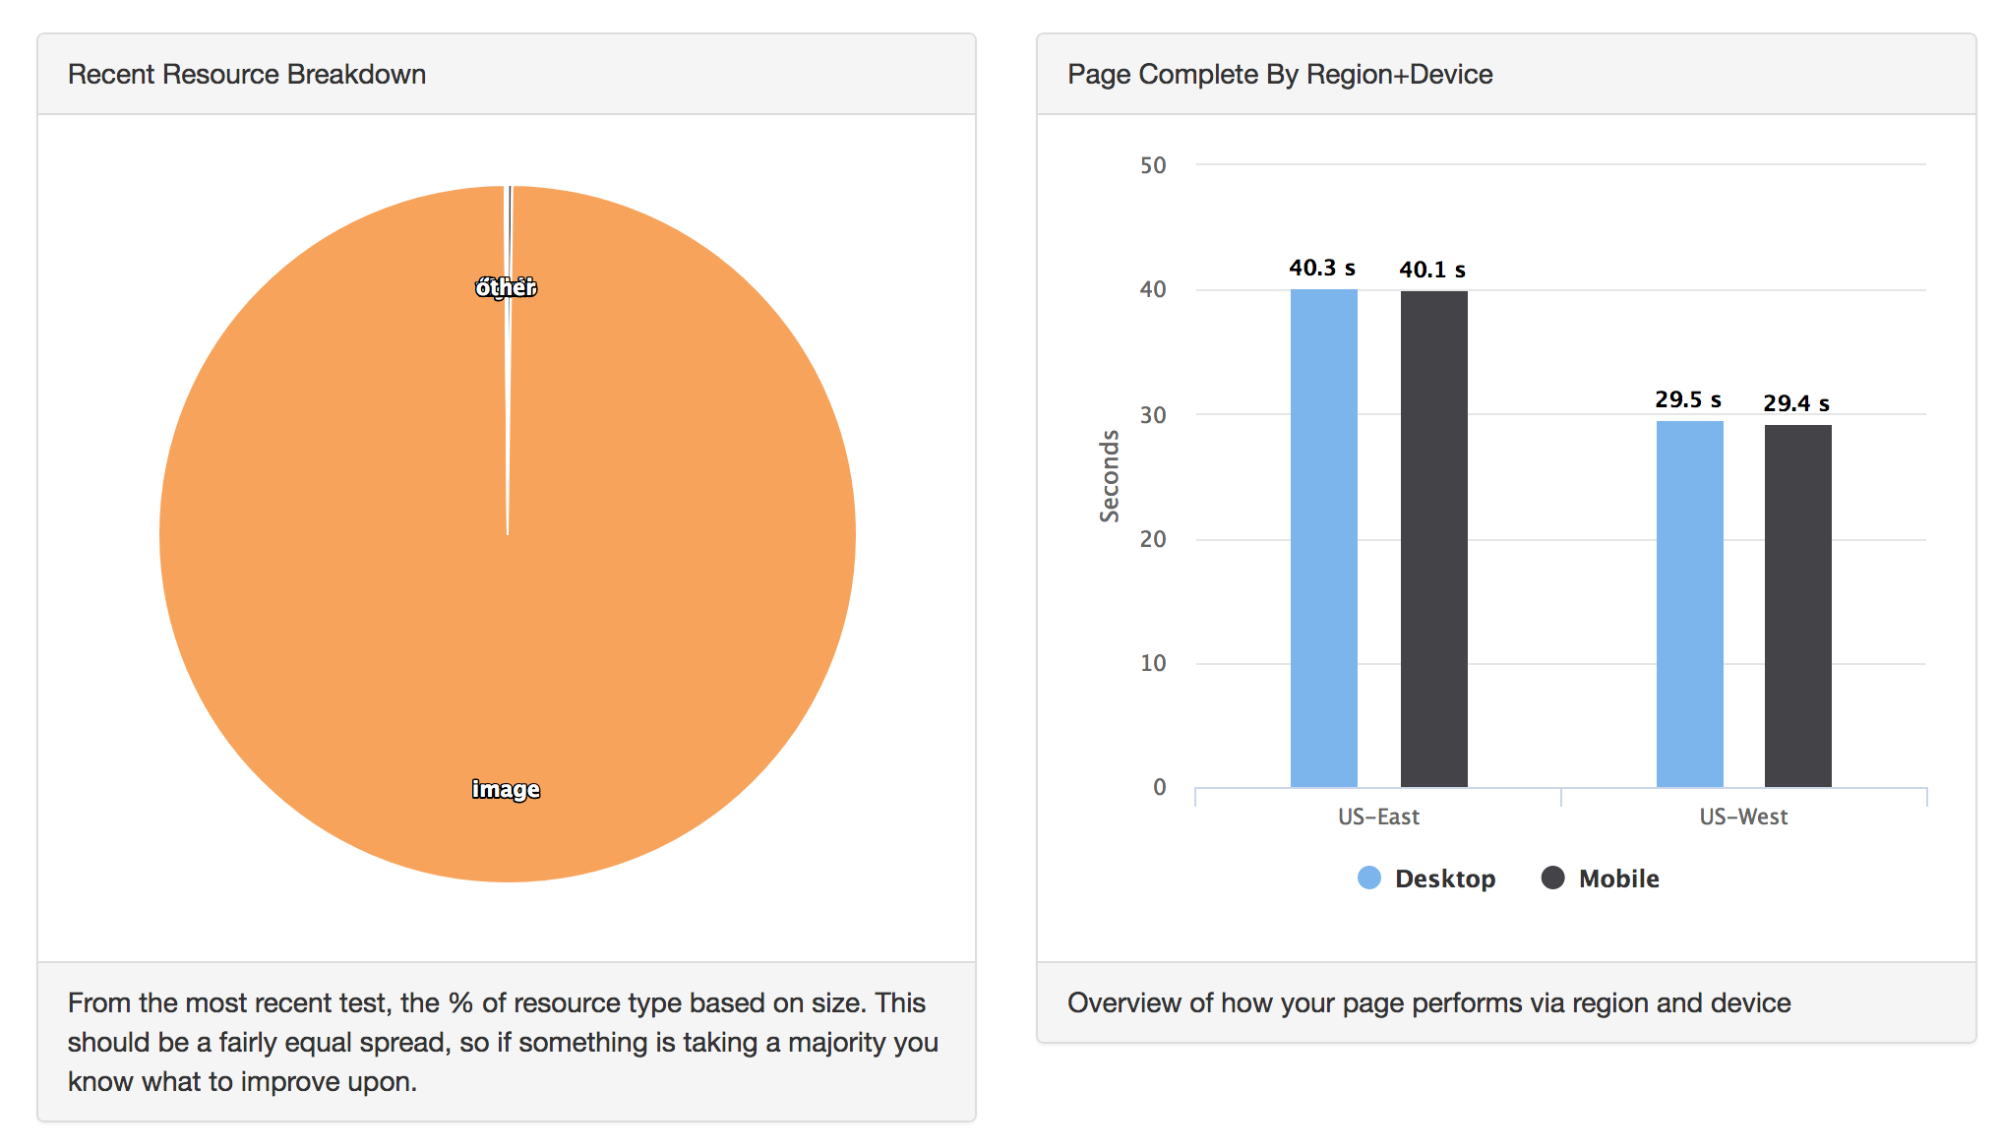
Example blog post (before lazy loading)
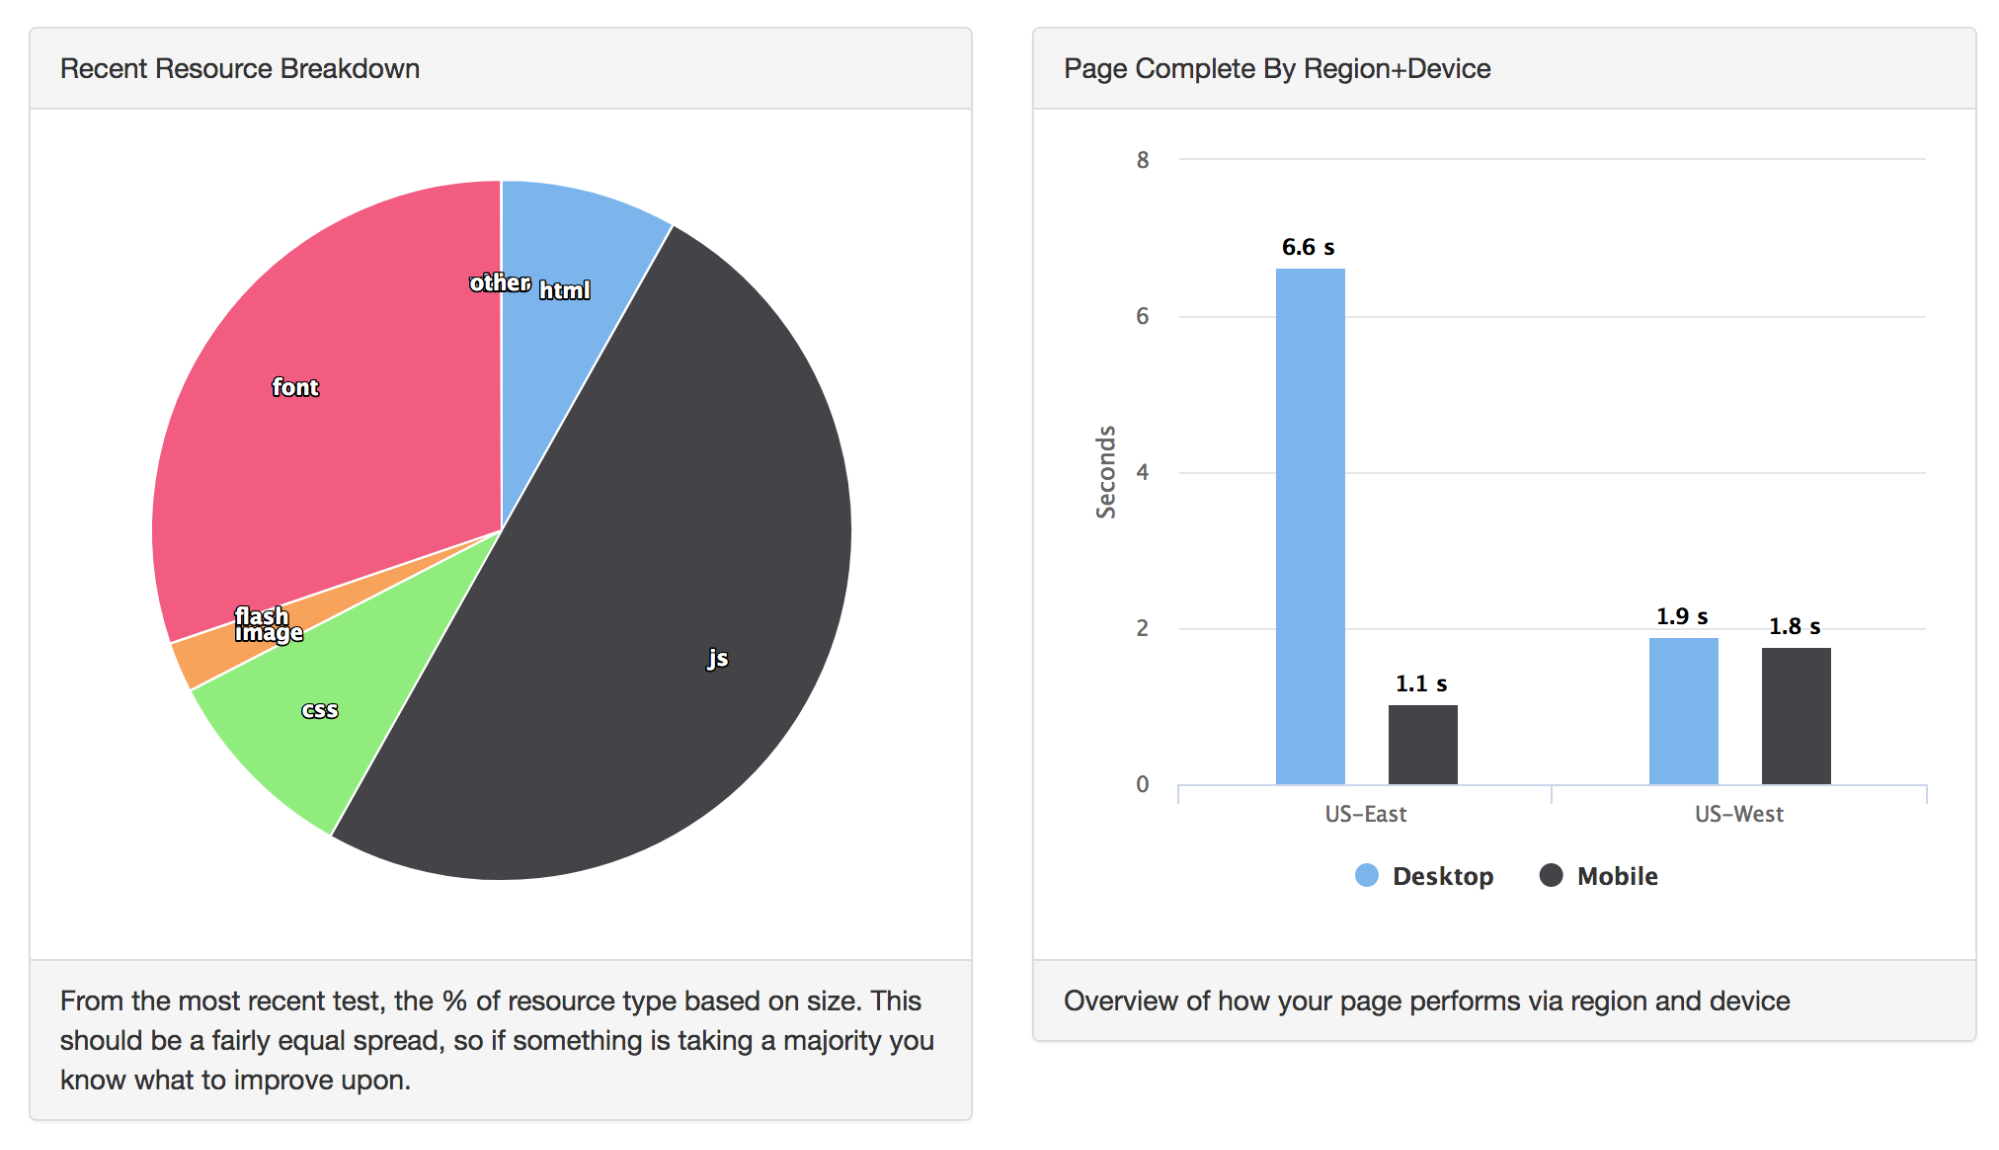
Example blog post (after lazy loading)
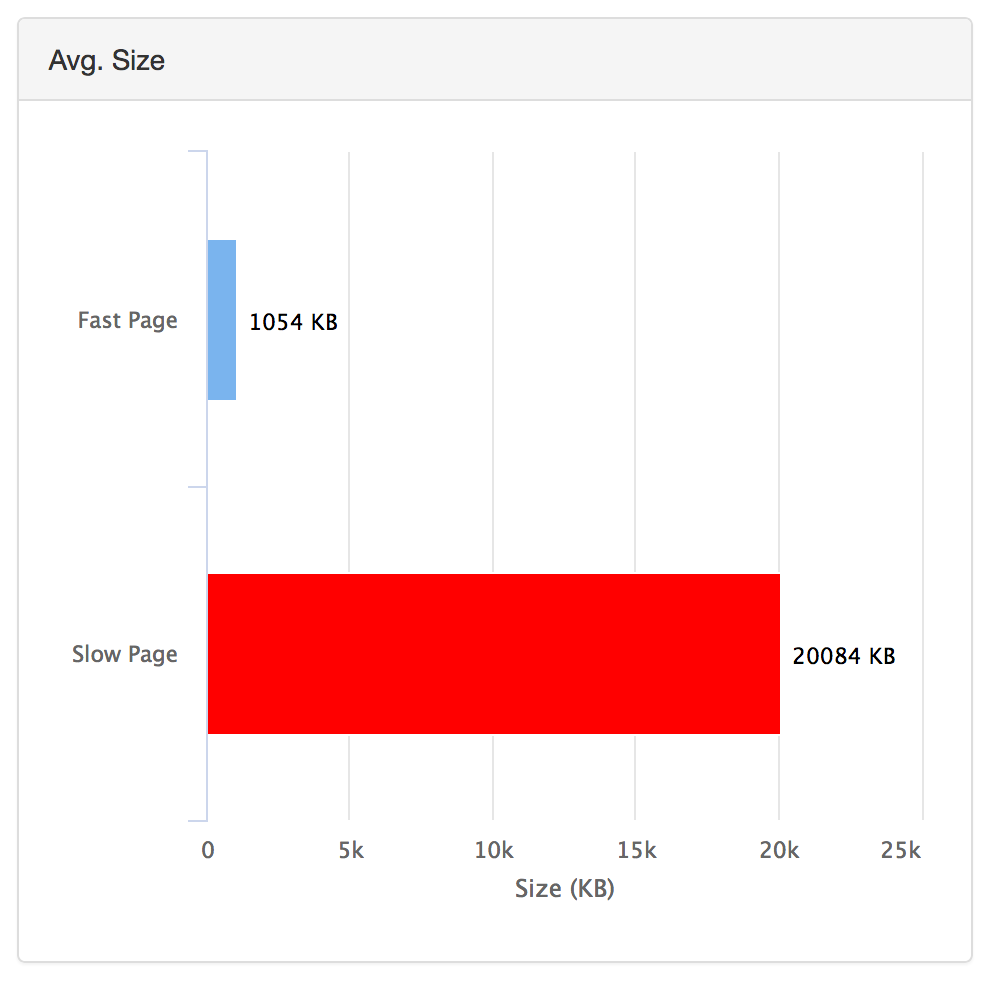
Did you notice the difference? If you’re not convinced, just take a look how much a difference our lazy loading script impacted our site’s performance:

With just one tiny script, we went from an F to an A on MachMetric’s performance grade. We reduced our page load time by over 90%. Our page size reduced by over 95%!
Ready to start lazy loading images now? Here’s the code, and it’s super simple!
Lazy loading — the code
Lazy loading is super easy to accomplish with JavaScript. Here’s all the code you need to start lazy loading today:
var images = document.querySelectorAll('.js-lazy-image');
var config = {
  rootMargin: '50px 0px',
  threshold: 0.01
};
var imageCount = images.length;
var observer;

var fetchImage = function(url) {
  return new Promise(function(resolve, reject) {
    var image = new Image();
    image.src = url;
    image.onload = resolve;
    image.onerror = reject;
  });
}

var preloadImage = function(image) {
  var src = image.dataset.src;
  if (!src) {
    return;
  }
  return fetchImage(src).then(function(){
    applyImage(image, src);
  });
}

var loadImagesImmediately = function(images) {
  for (image in images) {
    preloadImage(image);
  }
}

var onIntersection = function(entries) {
  if (imageCount === 0) {
    observer.disconnect();
  }
  for (entry in entries) {
    if (entry.intersectionRatio > 0) {
      imageCount--;
      observer.unobserve(entry.target);
      preloadImage(entry.target);
    }
  }
}

var applyImage = function(img, src) {
  img.classList.add('js-lazy-image--handled');
  img.src = src;
}

if (!('IntersectionObserver' in window)) {
  loadImagesImmediately(images);
} else {
  observer = new IntersectionObserver(onIntersection, config);
  for (image in images) {
    var image = images[i];
    if (image.classList.contains('js-lazy-image--handled')) {
      continue;
    }
    observer.observe(image);
  }
}
How it works
This script works by looking for images that have the class js-lazy-image. Those images must have a data attribute called data-src which has the location of the image, just like the normal src attribute would be filled out. The script then counts the number of images with this class, and when the viewport intersects with an observable area that includes the image, the source of the image is loaded from it’s data attributes, and the image renders on the screen! Here’s an example of how you would call lazy loaded images:
<img alt="Lazy" class="js-lazy-image" data-src="/location/of/my/image.jpg" />
As you can see, this works almost exactly like a regular image, but you just need to make sure to add on the special JavaScript class and add a data- prefix in front of your src attribute. And that’s all it takes to go from this:
To this:
How the script works — section by section
Still curious as to how the script works? Let’s break it down by section:
var images = document.querySelectorAll('.js-lazy-image');
var config = {
  rootMargin: '50px 0px',
  threshold: 0.01
};
var imageCount = images.length;
var observer;
Here we initialize our variables. Remember that class we added to our images? This is where we collect our images. The configuration will be used later with our observer class (don’t worry if you don’t know what that is, we’ll get to that in a second). Finally, we store the image count because we’ll be using that a few times throughout our script.
var fetchImage = function(url) {
  return new Promise(function(resolve, reject) {
    var image = new Image();
    image.src = url;
    image.onload = resolve;
    image.onerror = reject;
  });
}
Our first function deals with grabbing our images. We make use of JavaScript Promises to asynchronously load our images. If the Promise was resolved successfully, we load the image with the URL for our image source, otherwise we display an error. So where is this called from? Glad you asked…
var preloadImage = function(image) {
  var src = image.dataset.src;
  if (!src) {
    return;
  }
  return fetchImage(src).then(function(){
    applyImage(image, src);
  });
}
This image preload function grabs the image source from the data attribute we tacked onto our image tag. If it doesn’t find a source object, no problem, we just stop right there. Otherwise, we fetch our image, and if things go great, we apply the image to the DOM like so:
var applyImage = function(img, src) {
  img.classList.add('js-lazy-image--handled');
  img.src = src;
}
Our function simply finds the image we’re about to reveal, adds on a class to let our script know it has been handled, and then adds the URL to the image’s src attribute.
if (!('IntersectionObserver' in window)) {
  loadImagesImmediately(images);
} else {
  observer = new IntersectionObserver(onIntersection, config);
  for (image in images) {
    var image = images[i];
    if (image.classList.contains('js-lazy-image--handled')) {
      continue;
    }
    observer.observe(image);
  }
}
This is the meat-and-potatoes of our script. The core functionality that enables our lazy loading to happen quickly and efficiently revolves around the Intersection Observer API. This API allows us to track changes to the viewport against target elements asynchronously.
Traditionally you would have to do something like this with the Scroll Event which is both slow and called constantly. To combat this performance hiccup, you might using debouncing or throttling to limit the number of scroll event requests. But with Intersection Observers, this is all handled for you.
Remember the config variable at the top of our script? This is the configuration for our Intersection Observer. It tells us that when we are within a margin of 50px (vertically) from our image, that is when we want to activate our observation callback. The threshold, as you might guess, is the tolerance for what percentage of the object must be observed in order for the callback to be invoked once the margin is reached. In our case, we chose 1%, which is immediately upon bringing the image tag into view.
So now that we have that background, we can see how this if statement works. If we see that Intersection Observers are a part of the window object, we know we are in a browser that supports this functionality. As of right now, Intersection Observers are available on all major browser except IE and Safari. So if you are on IE or Safari, you will load the images immediately. If you aren’t, we create a new Intersection Observer object with the configuration we provided in the beginning, as well as a callback function to trigger when our target observation is reached.
Finally, we have to tell the Observer exactly what it has to observe for the callback to be initialized. In this case, we are observing all of the images that haven’t already been handled, which are the images that haven’t been applied to the DOM yet (via the applyImages function we saw earlier).
So what does loading images and the observation callback look like?
var loadImagesImmediately = function(images) {
  for (image in images) {
    preloadImage(image);
  }
}
For loading images immediately, it’s pretty straightforward. We simply preload all of the images and put them on the screen like we normally would.
var onIntersection = function(entries) {
  if (imageCount === 0) {
    observer.disconnect();
  }
  for (entry in entries) {
    if (entry.intersectionRatio > 0) {
      imageCount--;
      observer.unobserve(entry.target);
      preloadImage(entry.target);
    }
  }
}
Our intersection callback is a bit more involved. If we have loaded all of our images that have our lazy loading CSS class, we’re done and we can disconnect from our Observer object. Otherwise, for every observer entry in our IntersectionObserver, we want to activate our images. We do that by ensuring we have reached our threshold. intersectionRatio is the property we need to see if our target image element is visible within the threshold we defined in our configuration. If it is, the property returns a 1, otherwise it returns a 0. So if we have landed within our necessary ratio, we have one more image to add to the DOM, which means we can remove 1 from our count of images remaining to load. We can therefore stop observing this image because it’s going to be loaded onto the page. Finally, we use our previously-defined preloadImage to execute our now familiar process of adding the image URL onto the image tag and loading the image into the DOM.
Next steps
Lazy loading images is a quick and painless way to drastically improve the performance of your pages that use a lot of imagery. From there, be sure to compress your images and use the correct image format so you keep a small footprint. Tools like MachMetrics are a great way to track your performance improvements over time, as well as provide additional suggestions on how to continuously improve the performance of your application.
What other quick wins do you have for speeding up your site? Leave a reply in the comments below!
Originally published at www.machmetrics.com on May 24, 2018.
Get the FREE UI crash course
Sign up for our newsletter and receive a free UI crash course to help you build beautiful applications without needing a design background. Just enter your email below and you'll get a download link instantly.